
Understanding how someone interacts with your forms is critical for improving data collection, efficiency, and ROI. Integrating Google Analytics and Google Tag Manager is how you do that. Both are free, and setup is easy.
What you'll need:
Once these are set up, you must prepare your Google Analytics and Google Tag Manager tags, custom events, and workspaces. Below, we'll be using a test Shopify store for steps and screenshots, and things will look the same for other platforms like WordPress and BigCommerce as well.
If you need any help, please contact our support team for assistance. Let's go through each step. If you prefer to watch instead of read, please see this step-by-step instructional video.
1. Create Google Analytics and Google Tag Manager Workspace
First, we embed the POWR form on a specific product page and create a Google Tag Manager workspace.
Next, we will create a new web data stream connected to your home page in Google Analytics. Go to Admin > Data streams > Add stream > Web to do it.
2. Add Tags and Custom Events in Google Tag Manager
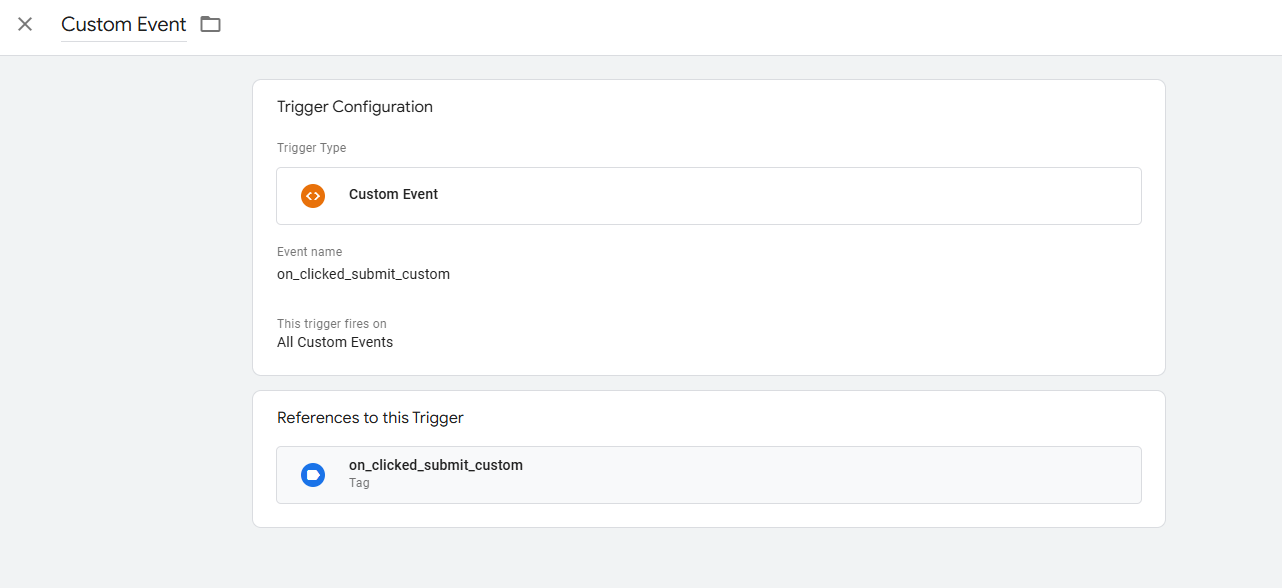
We need to create two tags and one trigger. First, the trigger.
- On the left, select Triggers
- In the top right, click New
- Click on the Trigger Configuration box
- Select Custom Event
- In Event name: We name this one on_clicked_submit_custom
- Choose All Custom Events
- Be sure to name your new Trigger before saving
*Copy and record your event name since you will use it in many different places
Now, let's create the first tag.
- On the left, select Tags
- In the top right, click New
- Click on the Tag Configuration box
- Choose tag type: Google Tag
- Take the MEASUREMENT ID from your data stream in Google Analytics (see below) and,
- paste it into the Tag ID box.
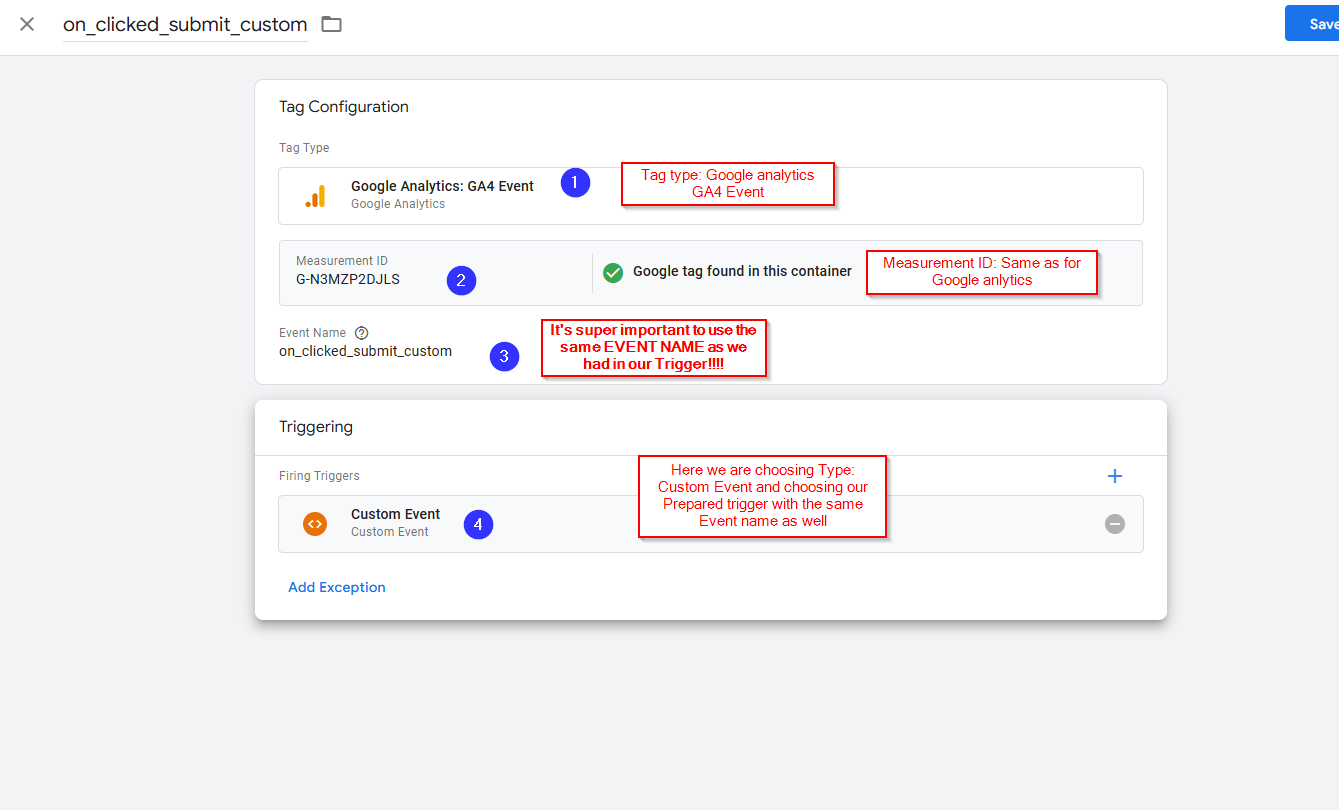
Let's create the 2nd tag for our Google Analytics Custom Event when someone submits a form:
- On the left, select Tags
- In the top right, click New
- Click on the Tag Configuration box
- Select Google Analytics and choose Google Analytics: GA4 Event
- In Measurement ID, use the same ID as we did above
- In Event Name, copy from before (on_clicked_submit_custom)
- Next, click on the Triggering box
- Choose the Custom Event with the correct Event Name (on_clicked_submit_custom)
*Please see screenshots below for more reference:
3. Activating POWR <> Google Tag Manager Integration
Now, we need to add some info from our Google Tag Manager and Google Analytics account to our form from the POWR Editor.
- In the POWR Editor, go to Settings > Google Tag Manager
- In 'GA tracking/GTM Container ID,' add your Google Analytics Measurement ID as we added from the Tags and Triggers above, and activate the toggle for 'Track form submission.'
- The 'Submission event name' is the same as what we had for our trigger in Google Tag Manager.
- In 'Website URL,' you use the URL of your home page.
- Activate the toggle 'Share submission data.'
- You will see a button Copy Code. We will need this button on the next step when we add the Google Analytics and Google Tag Manager codes to your site.
4. Adding Google Analytics and Google Tag Manager Code to Your Site
Now, we need to add the Google Analytics and Google Tag Manager code to our website. In this example, we used Shopify as the hosting platform; however, it can be used similarly on other platforms, such as Big Commerce or Wordpress.
- Go to your Google Tag Manager and copy the Google Tag Manager script.
- Go to your Shopify Store, and on the left navigation, click Themes > Edit code
- Find '</>theme.liquid'
- Paste the Google Tag script right after <head> tag and Save (in top right)
- Copy the second part of the Google Tag Manager code and
- paste at the bottom of </>theme.liquid code right between </script> and </body> and Save.
- Go back to the form Editor to Settings > Google Tag Manager
- Click on the Copy Code button.
*This additional step provides a special 'event listener' code that transfers submission events from your form to Google Analytics.
- Paste this code after </script> but before the Google Tag Manager code in </>theme.liquid we added earlier.
We are almost done! We only need to embed the form on the page and run a debug session to check if we did everything right.
5. Adding POWR Form to Shopify Product Page
It's an easy process. Follow the next steps:
- From the POWR Editor again, click 'Publish.'
- Choose 'Embed with Code,' then click 'Copy Code.'
- Go to Shopify Products > and click on Edit Product Page. The product page is just an example; this operation can be done in different places in Shopify.
- In the product page description, click Switch to HTML > Paste embed code > Save
- Publish your Store!
Debugging This Integration
Now, we need to check if we did everything correctly. Since we are using the Shopify Product page as an example, please ensure that your store is not password protected and that the page where we installed the form is public.
- Go to your Google Tag Manager and click on Preview.
- Tag Manager will open the debug window and ask which URL you want to check. Here, we should use the URL where we installed the POWR Form. In this case, it's the product page.
- Click Connect
- It should open a new tab on the page where the form is embedded and show the Connected Google Tag Assistant status.
- You may see a warning, but you can ignore this message. Just hide Google Tag assistant.
- Submit the Form
- Return to the Debug window and make sure that both tags have fired. (see example below)
- You can also go to your Analytics account and check
- Admin > DebugView
- Here, you will find different events, but want to find the event named on_click_submit_custom.
- If you see it, everything is working just fine, and this event will appear in your Google Analytics report in the next 24-48 hours.
*This is the common standard time for Google Analytics report updating
Again, if you need any help, please contact our support team for assistance. And, here again, is the step-by-step instructional video.
Don't have a POWR form? Get started for free
Comments
0 comments
Please sign in to leave a comment.